This article is for those who have a pioneer stereo that has the Bluetooth memory full issue. It will show you how to fix it and restore your pioneer stereo to its original working condition.
Almost all Pioneer car stereo owners have probably experienced the frustrating Bluetooth issue at some point. This is where your radio becomes disconnected from your phone and displays “Bluetooth memory full” or a Greyed out Bluetooth icon on your device.
The solution can be a bit different depending on what model you have. So, we’ll share with you the solution for the Pioneer AVH series and DEH series stereos so that you can follow the one that suits your product.
How to Clear Bluetooth Memory on Pioneer AVH Stereos
Follow these steps carefully to fix Pioneer Bluetooth pairing issue caused by full memory-
Engage the Parking Brake
Before you start with the process, make sure you engage the parking brake on your car. This will allow you to go into the Bluetooth settings. Otherwise, you’ll see a greyed-out Bluetooth icon that doesn’t let you do anything.
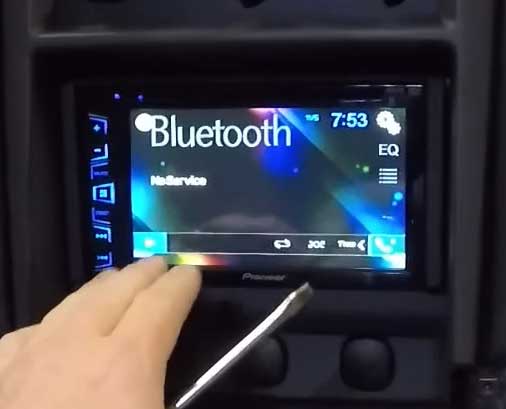
Go to Stereo System Menu
Press on the Menu icon on your stereo screen which looks like a Microsoft Windows logo. 4 square icon, I should so.
Head Over to Settings
Now, go to the system settings by clicking on the gear icon located at the top right corner of your screen.
Find Bluetooth
A new menu should appear on your screen with the Bluetooth icon located at the bottom of the screen. Click on that icon to access Bluetooth settings.
Clear the Bluetooth Memory
Now, scroll down and find the ‘Bluetooth Memory Clear’ option. Hit that option, and click ‘Clear’ on the next screen. It should ask you again to confirm the operation, simply click ‘Ok’ to confirm and you’re done! It should instantly clear the Bluetooth memory of your Pioneer AVH car stereo system.
Clear Bluetooth Memory on Pioneer DEH Series Car Stereos
The process here is also quite simple like the other one we’ve just discussed-
Find and Click on SRC Button
To start with the process, you need to turn off the stereo by pressing the SRC button first. Press and hold the button until it turns off.
Press MC Button
Now press the Multi-Control aka MC button to access the menu of the stereo.
Scroll to Clear Memory
Now that you’re in the menu, you need to scroll down until you find the ‘Clear Memory’ option. It can be a bit deep, so it may take a few scrolls before you get there.
Clear the Memory
After you find the Clear Memory option, press on MC button. You should see a new pop-up saying “Clear Memory Yes”. Just press the MC button again to confirm that you are deliberately clearing the memory. It should instantly clear the memory once you confirm that.
How to Fix Greyed Out Bluetooth icon on Pioneer Stereo
If the Bluetooth on your Pioneer receiver has just stopped working, then this should fix the problem.
Pioneer stereos have a protection mechanism that prevents you from messing up with certain settings and playing videos while you are driving.
So, to fix the greyed-out Bluetooth icon on your stereo, simply engage the parking brake. It should solve the issue.
However, if this didn’t solve the problem, you may have done a mistake while installing your radio system. Here’s how to solve the issue-
Remove the Car Stereo
Remove the radio from the dash to access the wires at the back of it. This shouldn’t be too hard to do. You can simply do this following our guide on removing pioneer car stereo.
Find Parking Brake Wire
Now, find the wire labeled as ‘Parking brake’ inside the housing. It should be light green but can be of different color on your car. In most cases, it is the light green wire. So, find that first to see if it is the correct one.
Connect the Wire to Parking Brake Ground
Now, strip the end of the wire and use a wire connector to connect this to your parking brake ground. Now, it will get the data on when the parking brake is engaged and when it’s not.
Reinstall the System
Now, reinstall the system carefully and check if everything works fine. Be sure to engage the parking brake to check if the problem got solved or not.
Bypass Parking Brake Method to Make the Bluetooth Working Always
Although this is a safety feature so that you don’t get into an accident while driving and enjoying certain types of media, you may need the fully functional stereo while driving for your kids or the company you have on the car.
In that case, you need to bypass the parking brake method. To do this, simply connect the parking brake wire to a screw on the back of your radio. This will bypass that security feature and will allow you to use the stereo while driving.
Caution: This will bypass some of the key safety features attached to your stereo system. So, I strongly recommend not to do that unless you need that to keep your kids busy so that they don’t disturb you on the road.
How Can I Connect, Disconnect or Delete a Bluetooth Device from My Pioneer Stereo?
It’s a simple method. Go to your Bluetooth by following the steps described above-
For AVH Series: Engage Parking Brake > Stereo System Menu > Settings > Bluetooth
For DEH Series: MC Button > Scroll to Bluetooth Audio
After you’re on the right spot, simply click on your desired options.
- Connect: for pairing or connecting a new device.
- Disconnect: for disconnecting a paired device.
- Delete: to delete a Bluetooth device.
Conclusion
Pioneer Bluetooth issues are easy to fix when you know how to do troubleshoot properly. In fact, you can tweak any type of Bluetooth settings including Pin Code change for Bluetooth Connections by simply going to the Bluetooth options and following the instructions on the screen.